Close Enough

So, are you ready to see our tiny lake house? Or, at least, take a look at a couple of rooms?  We are not completely finished, but, close enough! The complete tour would be too long for a blog post, so …

I’ll start with the most important room, and the reason we needed to build … the bathroom. The shower in the camping trailer just wasn’t cutting it for Saint. No elbow room.dscf0082
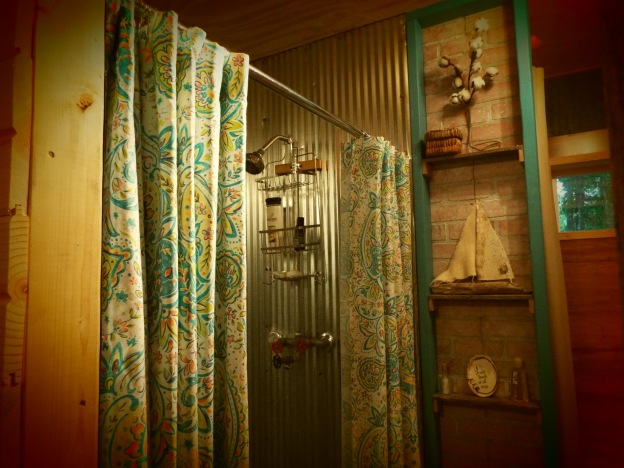
Now, he has plenty. The galvanized tin walls were my idea, well, mine and Pinterest, but they weren’t exactly like I planned. The vanity, however, turned out great.

dscf0108We made this from an old desk I found on Craig’s List. I loved the original finish and hardware, so Saint just cut a hole for the galvanized bucket, which used to be new and shiny and didn’t look like it belonged before I found a way to age it by squirting toilet bowl cleaner on it and leaving in the sun all afternoon. I wanted to incorporate some family artifacts. The brick came from the chimney of an old log cabin on our farm. My great grandfather and his new bride moved into the log cabin in 1888. I don’t know how old it was then, but these bricks have been around a long time. A couple of the barn wood boards framing the mirror, a flea market find, came from that cabin, but Dad was pretty meticulous in keeping everything cleaned up around it (at Mom’s suggestion). I’ll bet if she had known what price those old barn wood boards are bringing now, she would have changed her tune.The old barn tin came from the Huffman farm bunkhouse. Other boards came from Saint’s brother’s farm, along with more of the old tin that we used on the walls. Saint was all ready to use his miter saw and 45 those beautiful boards until I told him I wanted a more rustic look. I do love the way it turned out. Here are other pictures of the spacious bathroom … well, for a tiny house! And do you see how we threw in the industrial look with the towel rod and toilet paper holder made from flanges and pipes?

dscf0076dscf0113

In these last pictures, you can get a peek at the sliding barn door Saint made, and you can see the authentic hardware our dear friend gave us from an old barn. I left the rust because, well, who doesn’t like rust in rustic? You can also see the makeshift door (curtain) I made to hide the water heater.

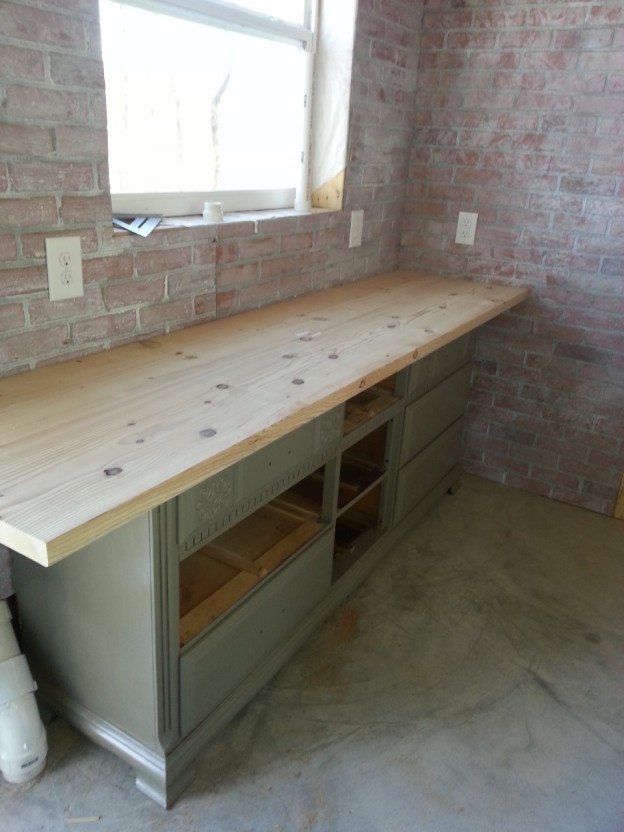
Now, on to the kitchen. My mom always said if she built a house, she would leave the kitchen out. Well, we almost did. Knowing that most of the lake cooking would be done on the grill, I didn’t want to give much of our tiny space to a kitchen, but I wanted a fully functioning place to prep and clean. We continued the industrial rustic, using the same plumbing pipes to hold up open shelves. The cabinet is an old dresser I bought (Craig’s List, again) from a lady in Branson. It came with two mirrors, and I paid $80.00 for it. After cleaning and chalk painting a sparrow gray, we added a wooden counter top. The trick was finding a sink that the dresser-turned- cabinet would accommodate. I choose a dresser rather than an unfinished cabinet because I wanted a narrow piece to save space. Saint was able to work on the drawers to salvage most of them as he cut out the space for the sink and plumbing. We changed out the hardware and it’s good to go. By the way, I refinished both mirrors and could probably sell them for what I paid for the whole thing, but I may use one in the living room, later. And the brick … isn’t it amazing? Looks pretty authentic, right? Faux brick panels from Home Depot. The trick was whitewashing and blotting to get the antiqued look.

thumbnail_20160314_161544

dscf0072


dscf0073Equipped with a small refrigerator, microwave, coffee pot, two burner hot plate, toaster oven, and crock pot, we’re all set. The galvanized tin in back of the shower makes a nice back drop for pantry items, too. And the view from the kitchen window

dscf0095makes even the tiniest kitchen picture perfect.

But, where do we eat, you ask? Mostly here.

dscf0105on the porch overlooking the lake, but if we have to eat inside, we have this cute little drop leaf table with a (I know, who needs this) TV above it.

dscf0087I still have some pieces to add and decorating to finish in the main area, and since this blog post is way longer than recommended, anyway, I’ll save the bed and living area, along with the details and how God has blessed this project for another day. Thanks for looking.

Please Be Seated

I’m dreaming of a beautiful tablescape for Christmas brunch. I lust spend hours looking at and pinning gorgeous settings on my Pinterest boards. When I try to create them, I fall short. When I try to capture even that shortness on camera, I completely fail. That never stops me from trying.

Remember those wooden discs I left from last post? No? Well, let me refresh your memory.

DSC00040I couldn’t let them go to waste after Saint so carefully cut them, and I sanded and clear-coated them. But when I went back to look at my inspiration picture at this blog:http://redheadcandecorate.com/4/post/2014/11/mini-tree-stump-christmas-place-card-holders.html

I realized my wooden circles were much larger than the ones I wanted to recreate. I also knew I wanted to use what I had on hand rather than adding to my chaos stash of Christmas decor. I loved the small jewel toned ornaments that The Red Head used, but I had only clear, burgundy, and gold. And, what I did have was crinoline. I love that stuff! There’s just something so romantic and feminine about it, agree?

DSC00062I also had a whole woods full of nature. So, I went gathering the naturals: boxwood, cedar, bark, twigs and sticks. Then I got my supplies and trusty hot glue gun. Just when I thought I had all that iridescent snow cleaned up, I grabbed it and started sticking it onto those wooden discs.

DSC00063

I started with the clear ornaments which I wrapped in crinoline and tied with shiny pink or white ribbon. I used a bit of the naturals plus odds and ends I had in my craft bag. When I had hot glued the ornament to the disc and added greenery, etc, I cut some black tag board rectangles for the names. My intent was to use a chalk pen so it would be erasable. Silly me. The chalk pen didn’t show up well enough, besides, who wants to store and reuse black paper rectangles? A metallic pen worked much better.

DSC00065

I had six clear ornaments, which I wrapped in crinoline. One table will only seat six people. The other six mixed ornaments needed to be cohesive in some way. I’m not into the matchy-matchy, but I did want them to look like they belonged together…like family, you know. The naturals I had gathered worked in doing just that. Here are a few of them.

DSC00064DSC00068

DSC00073DSC00076

And here’s what they look like all set up and ready for breakfast.

DSC00077

DSC00079

I know what you’re thinking…this girl really needs a new camera, and it’s probably true. But then I would need a tutor. You know, If You Give a Girl a Camera, she’s gonna want to take some pictures. And when she turns on the camera, she’s gonna need someone to show her how to use it. I’m thinking a photography class might be a good first step.

So what I lack in photography skills, I make up for in cre I still lack in photography skills. Never let it be said that I am not persistent, though. Or conservative. Just look at the Christmas tags I made from the leftover sticks and twigs.

DSC00083

I’m not giving up on making the cute ones I linked you to…just not this year.

A Project and a Plan

It started as a quiet walk in the woods as Saint and I went looking for a log suitable for cutting wooden discs to turn into place cards for Christmas Breakfast.

DSC00040And it ended in this.

DSC00041As we passed the junk scrap wood pile, I noticed the legs I’d kept from a piece of furniture that we dismantled for another project. It’s hard to throw away good bones. I dragged it to the house where it sat under the deck for a few days, just long enough for it to call out to the weathered pallet propped against the wood pile. Saint and his saw soon merged the two into the “canvas.”

DSC00034This is the back side where he cut and attached the pallet wood to the frame.

I downloaded a deer silhouette from Pinterest.

DSC00033I positioned it on the “canvas” and set about using a stipple brush and some old jar of off white paint and water to whitewash the boards around the stencil.

DSC00038 DSC00037So then it was just a matter of deciding how to adorn it. I had already decided what to do with it. It looked like something our daughter-in-law would like. But then I wasn’t sure. She was coming over soon, so I told Saint we would put it on our porch; if she noticed it and liked it, it would be hers. If not, it looked pretty good right on our front porch.

DSC00042It went home with her! And she left something much better…but just for the weekend. And that’s the PLAN part of this post.

The Polar Express has long been one of my favorite Christmas read-alouds, probably beginning with the year that actress Tess Harper came to our classroom and read it to the kids. She cried. I cried. We were neither one sure the kids enjoyed it half as much as we did. Anyway, the plan was to create our little Polar Express tour of area Christmas lights with our granddaughter and her adorable friend.

I made tickets and bells. They wore their pajamas and hats…

DSC00044And we boarded the train Avalanche with blankets, snack mix, and hot chocolate.

DSC00045Saint “engineered” us to the lights.

DSC00047 DSC00048After seeing the lights in rural Rogersville and a trip by the turn of the century home where we lived for several years, the girls voted to skip Springfield in favor of the horse drawn carriage ride through the Ozark City Park light display.

20141213_183944-1And even though it was a mild 50 degree evening, we thought we needed snow. We tried to create our own using a combination of corn starch, shaving cream, and iridescent snow flakes.

DSC00051 DSC00052You can’t fool Mother Nature! It was too warm for snow. The iridescent flakes hurt the girls’ hands. The mixture wouldn’t stick together enough to make a snowman, but did manage to stick in every crack and crevice in the kitchen floor. That project was filed in…you guessed it…13.

We did successfully complete a couple of others.

DSC00055And have a fun breakfast with these DEER young ladies before our adventure ended.

DSC00057

The wooden discs are still waiting in the work room. We’ll see what happens. I believe! Maybe the next post.

Merry Christmas!

Merry Thanksgivmas!

I tried. I really did. But it snowed, people! And it got chilly record-breakingly cold! And so what’s a body to do other than turn up the heat and put up the Christmas tree, right?  And besides, I lost might have misplaced my wedding rings, and I needed to move all the furniture, remove all the sofa cushions, and vacuum up all that popcorn chips dust that gathers in everyone’s house, of course. And so, when I rearranged everything, the only thing I found was a big empty space on one side of the room! No rings. Not even pocket change. Just a big empty corner that kept screaming, “CHRISTMAS TREE.”

DSC00340

 I know I said last year was the last year for this tree, but here it is, more than a week before Thanksgiving and that tree is here. And I stayed with the same earthy tones. Rust just seems to fit in with our life style. The one thing I did differently this year was the garland. I left it off completely and went with ribbon. It was a much simpler process that I learned about here:

http://apopofpretty.com/tree-decorating-tips-ribbon/


how to add ribbon to a Christmas tree

If you are tired of winding twisting wadding messing with garland, give this a try. I mostly used ribbon I already had. I had planned to replace all my old lights with LED fancy ones and do the rag treatment that I used last year to make the swag for my dining room:

https://thymelesssageandrandomrants.wordpress.com/2013/11/28/let-the-fa-la-la-ing-begin/

DSC00135


but I was just too lazy exhausted from all that wedding ring hunting.

Now, I have all the boxes strung all over pulled out of their highly organized space, but I am trying…really trying not to do any more Christmas decorating until AFTER Thanksgiving. And, no, I will not be shopping on Black Friday. I’ll be heading to Columbia for the big Rivalry Line game. Let the MIZ-sooie-ing begin!


All Those F Words

July… the perfect time for all those F words. Like Fourth. And Fun. Family, Fireworks, Food. And the perfect time for a casual, laid-back celebration, even if you do it on the 7th instead of the Fourth.


Science-Viscosity fun

Science-Viscosity fun

DSC00204

And art


And on to getting ready for a family get together. We found a great way to simplify the serving line. Punch a hole or two into the side of your paper plates, and tie the napkins and tableware to the plate; it saves time and space in addition to upping the cuteness factor. Speaking of cuteness.

DSC00193       DSC00194


Elle loves drawing and painting, so I thought we’d use some of her talent to decorate and learn at the same time. She said she had studied several artists at Espy Elementary, but she was not familiar with Georgia O’Keefe. We looked at her career and some of her work on the internet and decided to try to use some of her techniques for our celebration.

DSC00190DSC00209


I always report on our failures as well as our successes. This was a success in that we learned and experienced, and Elle did beautiful work, but I had read about a technique to use under glass plates. It involved printed vintage-look tissue paper ironed between waxed paper. I had done it before using the tissue paper and thought it should transfer to the coffee filters we used to paint our flowers. If it had, it would have been a beautiful thing to put on our serving pieces, but it didn’t. I ironed and pressed, but it didn’t stick. Elle took her art work home, and, well, I didn’t quite know what to do with mine.

I’m past the stage of hanging things on the fridge. 🙂

DSC00212


Food

Star shaped fruit pizzas designed by Elle add to the patriotic theme, as do the “sparkler” chocolate dipped pretzels and the fresh strawberry yogurt cake.

DSC00196   DSC00222


I was able to use the flag she made and some Japanese lanterns in with the red, white, and blue garland for the deck rails. And, I was glad I didn’t have time to involve her in making that garland. I used three plastic table cloths from the Dollar Tree, cut them in half, placed one on top of the others, and then slit all three layers to within 5 inches of the top. Then I braided the strands and knotted them together. It turned out okay, but was more time consuming than it was worth. It did withstand the wind for several days, though, so I won’t totally cross that off the list.

DSC00217


Another thing we did was play work with balloons. We filled the red, white, and blue ones with water and froze them to use in the cooler…a festive way to keep drinks cool. The activated glow sticks under the ice made it really pretty at night.

DSC00225   DSC00191Those were some tough balloons!


And we planned a water gun game using golf tees and ping pong balls.

SISTERS

SISTERS

Family

A visit from an aunt and uncle from Washington made this Fourth of July Freedom celebration a special time. We missed having Lance and Carley here, but were so glad to have the rest of the family together.

DSC00226


Saint manned the grill and, with Elle’s assistance, shot a few fireworks off without a visit to the ER, so, all in all, I’d say all our F words were good ones.

DSC00224

                                 Fun, Family, Food, Fourth, Fireworks!

Pinspiration

Winter weather advisory + sleet = a pot of chili simmering. And projects.

My morning jaunt through Pinterest led me to a virtual holiday home tour here:

Jennifer Rizzo’s Holiday Housewalk 2013!

I tried. I really did, but after 30 minutes, I determined it would take me hours to find the exact spot for the inspirations for today’s projects, so just go touring like I did. Each and every house has its own flavor, and if you can’t be inspired…well, Bah Humbug!

The first attempt came from this comfy old sweater.

DSC00171Saint has loved this sweater for years, but the cuffs on the sleeves have frayed. Plus, I cut a big hunk out of it to make the sweater pumpkin last month. 🙂

I cut one of the sleeves off to wrap around this candle holder. I intended to use the frayed cuff at the top, but it wouldn’t fit. The tutorial suggested using the ragged edge, anyway, so this worked.

DSC00173A strip of burlap secured with a piece of jute twine tied in a bow with greenery and berries tucked in complete the coziness.

DSC00178This will feel right at home in a guest bathroom.

At another site on the tour, I saw a cute old toy truck carrying home a bottle brush Christmas tree. I don’t have any bottle brush trees, but I plan on adding some at end of the season sales, this year. In the mean time, I traipsed through the sleet and cold to one of the many little cedar trees we have here on Redbud Ridge and clipped a few sprigs.

DSC00179Finally, while touring, I found just what I had been looking for to complete one of my new family members’ stocking. The hostess referred back to the source of the vintage Paris print, and I found just what I wanted here:

thegraphicsfairy.com

I have used some of The Graphics Fairy’s free printables before. This is a great site for teachers who may be looking for art to enhance a project or center activity. I printed out the Eiffel Tower, mounted it on some brown bag paper, glittered it up a bit, and added some black ribbon so that I can pin the tag to the stocking. I think it gave it just the look I wanted for this lovely lady’s stocking.

DSC00176All that before noon! And I didn’t hit all the houses on the tour, so I may have to re visit this afternoon. The chili was good, the fire even better. What did you do on your wintry day?

Step by Step DIY for your Christmas Mantel

DSC00144

I love a lush, gaudy full Christmas mantel, but it isn’t always an easy thing to achieve. A few years ago, I came across a tip in a magazine that completely removed all the stress of holiday decorating streamlined the mantel project. It started with a board, measured and cut to fit the mantel.

DSC00139Saint measured and cut out the space for the electrical outlet that allows us to plug in lamps and Christmas lights without a cord hanging down. Then he hammered small tacks in a triangular pattern all across the board. There is no need to measure or fret about where to put these as they are completely covered and only serve to anchor the wire that he threaded around and between tacks.

DSC00142

Now it is time to add all the greenery. I like to use several small pieces rather than one long one because you can add texture by using different greenery, and you can alter the thickness as needed.

DSC00147

Sometimes I wire the greenery on; other times I simply wind a strand of the greenery around the wire. This is nice and secure with nothing taped or tacked to the wood on our mantel.

I had not planned to use this antique frame this year, but it just jumped up there and would not let me take it down.

DSC00148

Next, I add bits and pieces along with lights.

DSC00149 DSC00153

I could stop here and hang stockings, but this year I have ten stockings to hang, and they will not fit here or on the basement fireplace. We do love stockings in our family! Maybe I’ll show you that update later. I’m still working on it, now. Anyway, I like the rusty jingle bells hanging down, and on the way to the Mizzou game yesterday, I scored these perfect over sized ornaments (at Home Goods) to accompany them.

DSC00159

These ornaments are rather heavy, but they came with ribbon hangers which loop perfectly over the heads of the tacks in the anchor board and attach with no extra nails, tape, or danger of becoming detached from the greenery.

There you have it. It’s really all about the anchor board that you never ever see on the finished project.

DSC00167Cozy, isn’t it?

Let the Fa La La-ing begin!

I think I may be responsible for the killing of an elf, today. Our son told his wife that Santa has to kill an elf for every day that we start putting up our Christmas decorations before Thanksgiving. Sounds to me like a slacker trying to get out of putting up lights, but I’m not sure.

I usually do wait until after Christmas because I like to give Thanksgiving its due, but I’m not cooking or hosting this year, and Thanksgiving and Christmas are so close together, I decided it was the right thing to do. I’ll stop short of Christmas shopping on Thanksgiving Day, but I saw this cute idea that begged me to try it, and then that led to something else and another something, and, well, you know!

It started with an ordinary strand of twinkle lights. And ended like this:

DSC00154


There is no way to capture the ambiance this little garland has created. I tried different lightings and flash settings, tried my phone camera, and my BFF even tried with hers. You just have to take my word for it.

It was a very simple, but somewhat time consuming project. It’s one you can start, put down for a bit and come back to…unless you are impatient like I am. Here’s the step-by-step DIY.

DSC00131


1. Decide the tone or colors you want to use, gather fabric odds and ends and/or ribbon.

2. Cut fabric into strips. Mine were 5 to 6 inches. You do not need to measure, especially if you are going for the shabby look. The number of strips depends upon the length of your light strand and your personal preference about how you want it to look. This fabric is the only thing I purchased. I liked the color combo to go with the green tones in my dining room. To that I added some green ribbon I had already purchased for another project, some white I had cut off an old sheer curtain, some off white rayon scraps, and a few odds and ends.

3. Stretch the string of lights out on the floor and begin tying the strands of fabric between the lights. I tied all the fabric pictured first, spacing out the color

DSC00132


Next, I added the ribbon ties, and finally, I added the other tones of white and off white in between those.

DSC00135


4. Drape your garland any way you wish. I tied mine to the curtain rod using some of the fabric strands.

DSC00134


These shabby lighted garlands would look great on a mantel, over a door, mixed with greenery, or even on your Christmas tree.

DSC00154


I’m sorry about the elf, but I sure am enjoying these lights. And, no, I did not put up the tree, but I got a good start on the mantel. When I finish, I’ll share a few tricks you may or may not know about putting together your mantel decor…but I’ll wait until AFTER Thanksgiving Day. Be thankful!


Upcycled

DSC00102


I know. You are wondering what this bright yellow-green tennis ball is doing in the middle of all these pumpkins, right? Well, at an antique shop the other day, I saw some pumpkins made from an old chenille bedspread. I thought an old sweater would work just as well, and I was pondering what to use as a form. I walked to the garage, and lo and behold, there was a tennis ball hanging down on a piece of fishing line. Saint put it there so I’d Know when to stop my car…to keep from running into the house, I suppose. No, it lets me know when my car has cleared the electric eye on the garage door, actually. Anyway, I asked if he had any more old tennis balls. I knew they’d be old since we haven’t played in months years a while. He found ONE! I also spotted some quilt batting, or pillow stuffing, depending upon the project. I cut out a circle that would completely encompass the tennis ball. I used both Tacky Glue and hot glue for this project, starting with Tacky, which I squeezed onto the tennis ball, pulling up the batting around it and patting it all down smoothly.

DSC00103


Next, I cut a slightly larger circle from the sweater and followed the same procedure.

DSC00106


This time, I pressed all the fabric in at the top, pushing down really hard, and hot glued the top shut. Next, I used jute twine to wrap around the form in places to create the pumpkin “creases” and tied a bow at the top. I added some bittersweet, and, voila! A pumpkin from an old tennis ball.

DSC00118


On the hardness scale from 1-10, this was definitely an easy 1. This is a fun thing to do with your kids. If it is too late for the Thanksgiving table, you could play around with making them into Christmas ornaments. They would add warmth and texture to your tree decor.

Holidays Stressing You Out? Get Plastered!

Wait, my friends who know that, aside from the celebratory glass of wine, I’m pretty much a teetotaler; before you judge me, this post has nothing to do with forbidden fruit. Or beverage, although fruit would probably work well in this project. In fact, the only similarity to that getting plastered and this getting plastered is that it gets messy.

I came across this technique blog hopping at http://www.songbirdblog.com  and thought…hmmm. This should work on all sorts of fake stuff. I meant to get Dollar Tree plastic pumpkins, but they sold out at Halloween. I already had lots of fake leaves, but I finally found the pumpkins at an antique shop on clearance for cheap. Here’s what I started with:

DSC00111


And this is how it ended:

DSC00127


I do love orange, but it doesn’t go with much my decor, and whites are trending right now, so…not bad for pennies, huh?

Here is the tutorial for the technique:

Mix Plaster of Paris with water until you have a mixture similar to ranch dressing. If you get gravy, throw it out and start over.

DSC00112


I moved outside to do this because I thought I needed my clothesline to hang the leaves. I spread a plastic sheet under the clothesline and started dipping.

DSC00113


I dipped once and hung them on the line. MAJOR MISTAKE!

DSC00115


What a mess! See how one hangs down like it is supposed to and the other one does not? The process of it going from hanging down to sticking up showered me with wet plaster and just made a mess of my clothes pins and clothes line. No problem, because, you know, clothes lines and clothes pins need to be cleaned often occasionally at least once in their lives, right? But I found that laying the items down on the plastic to dry worked fine.

DSC00120


I gave the pumpkins (and the hanging leaves) two coats. How easy is that?!

In fact, I tried some old cheap roses and other small silk flowers and greenery. I found that the small ones turn out great…the larger ones droop!

DSC00122


These will be pretty for Christmas!


DSC00129 DSC00127 DSC00128


There you have it! Quite a transformation, I think. An easy holiday centerpiece or added decor for your Thanksgiving celebration. I think these plastered items would look elegant on a white ironstone platter, or in a ceramic turkey. Best of all…no hangover.   :))